26 May 2012

Shaved Zucchini-Fennel Salad

Ingredients

  • 1 pound zucchini (2-3 medium) (>>I typically grab one yellow and the rest green, just to add some visual interest.  You can also do a couple of radishes as well, if you have any handy.)
  • 1 large bulb fennel, quartered and cored, fronds reserved (>>A small one is totally fine.  The fronds are the green, dill-looking things at the top.)
  • 2 tablespoons extra-virgin olive oil
  • 2 tablespoons lemon juice
  • 3/4 teaspoon salt
  • 1/4 teaspoon freshly ground pepper
  • 1/4 cup slivered red onion (>>I added about a tbs of a sweet onion instead and it was fine.)
  • 6 tablespoons shredded Manchego or Asiago cheese (>>I may try Parmesan next time, but either way, it has to be fresh.)

Preparation

  1. Very thinly slice zucchini lengthwise into long strips with a vegetable peeler, mandoline or knife. Place the strips on a double layer of paper towel and let stand while you prepare the rest of the salad. (>>I loosely pressed them between two sheets of paper towel and it was fine.  You just don't want them dripping, otherwise they won't absorb the dressing.)
  2. Very thinly slice fennel bulb with a knife or mandoline. Chop enough fronds to equal about 1/4 cup (>>Roughly. If you don't hit 1/4 cup, it's fine). Whisk oil, lemon juice, salt and pepper in a large bowl. Add the zucchini, fennel, fronds and onion; gently stir to coat well. Serve sprinkled with cheese.
Original recipe found here.

29 April 2012

Roasted Chicken

The first time I made this was when I was having a certain special gentleman over for dinner for the first time.  I went to Cumbrae's (my butcher) and was talking to the person behind the counter about how I wanted something that was both fancier than chicken legs and less prone to drying out than chicken breasts.  And then I caught sight of the whole chickens.  I decided that roasting a chicken couldn't be that hard, and it wasn't.  Don't get me wrong; this is not a thirty minute meal and the cleanup can be intensive.  But, all things considered, the work is absolutely worth the final product.


3 or 4 lb. chicken
1/4 to 1/3 cup (ish) cold, unsalted butter
1/4 or 1/2 a lemon
1/2 an onion
fresh thyme
freshly cracked sea salt and black pepper
A few generous splashes of olive oil


Preheat your oven to 350 degrees.
Rinse your chicken with cold water (inside and out) and place on a large plate.  Pat dry with paper towels.  Wash your sink.


Cut the pieces of butter into little pats and slide the pieces under the skin so that they are distributed evenly.  You don't want an outrageous amount of butter, obviously, but this will help keep the chicken moist.  If you felt like getting ambitious, you could mix the butter with some herbs or roasted garlic.  I've heard that olive oil is a suitable (and healthier) alternative.


Thoroughly salt and pepper the outside and inside of the chicken.  This is pretty crucial.  I typically don't like adding much salt to anything, and the first time I made this I skimped on the salt (skipping the inside of the chicken entirely).  It was a mistake.  For this kind of a meal, you just have to embrace the salt.


To the cavity inside the chicken, add the sprigs of thyme and then as much onion and lemon as you can fit.  Then, using some string or kitchen twine, truss your chicken (pulling the wings and legs close to the main body so they all cook in the same amount of time).  There are a few ways to do it, but here's one video that's helpful.


Place the chicken in your roasting pan.  You don't need one of the big, lidded pans that get used at Thanksgiving; just anything with higher sides will do.  Ideally, you'll have some sort of tray to put in the bottom that will lift the chicken up out of the juices, but it's not the end of the world if you don't.  (I don't have one but will probably invest in one someday.)  Slosh some olive oil over the top, and toss any leftover onion pieces into the bottom of the pan.


If you felt like roasting any root vegetables for your meal, this would be the time to add them.  Carrots, parboiled potatoes, turnips, s'all good.


Roast for approximately an hour and a half, or until your meat thermometer says it's safe.  The joints should feel loose, and don't be afraid to cut into the breast meat to see if it looks like it's cooked enough.  Pull the chicken out three or four times for basting.  When it's done, pull it out of the pan and let it rest for fifteen minutes, covering with foil to keep it warm.  Serve with some of the juices spooned on top. Finito!


If you're interested, the carcass can be used to make your own chicken broth, which would be pretty awesome to have in the freezer.

Chicken Noodle Soup

This recipe came out of a conversation with my colleague Margaret, who has established her own recipe based on the tips from her Polish mother and grandmother, as well as her Italian mother-in-law.  My recipe is based on her instructions, but with a few moderations.  She prefers her soup as a broth, whereas I like mine with more 'stuff' in it.  To each their own.  I usually just eyeball the measurements of everything I add, so the amounts below are approximate.  Next time I make this, I'm thinking of adding some broccoli.


2 large chicken legs
2 tablespoons of vegetable broth base (I use an organic one that my Mom gave me)
1 white onion, peeled
4 cloves of garlic, peeled
4 or 5 carrots, diced
2 stalks of celery, diced
1 or 2 parmesan cheese rinds (though just a 1-inch knob of the actual cheese will do in a pinch)
1/2 cup (ish) of white wine (whatever you've got)
Sea salt and pepper
Optional: a tea pouch full of allspice (I've never had it on hand to add, but M says it's great)
Uncooked bow-tie pasta (or whichever noodle you prefer)


Bring a large soup pot full of water to a boil.  Add the chicken legs.  Boil for thirty to forty-five minutes.  (Margaret suggested a full hour, but by that point the chicken ends up being shredded mush.  She always removes the chicken pieces, so it doesn't matter to her, but I leave mine in and find that they hold together better if I cut down the boiling time.)


Add the broth base, the whole onion and garlic (if you're fancy, you can cut slivers into the onion with a knife and jam the garlic in), the carrots, the celery, the parmesan, and the allspice.  Add a generous amount of freshly ground sea salt and pepper, to taste.


Let everything boil for about an hour on lower heat with the the lid off the pot.  Remove the chicken bones and skin.  Taste the soup to see if it needs more salt or pepper.  Add a few generous splashes of white wine (also to taste).


Add the pasta, allowing it to cook until al dente.  I prefer letting the pasta cook in the soup because the starches will seep into the broth and help thicken it up.  If you prefer a clearer, thinner broth, then perhaps cooking the pasta in another pot first would be better.


As far as leftovers go, I find that the pasta will absorb a lot of the liquid from the broth when I store this in the fridge.  It doesn't really stress me out - I just add a bit of water whenever I'm reheating the soup.  In the end, it tends to be a rather thick soup.

Chocolate Coconut Macaroons

This is another recipe from the The Gluten-Free Almond Flour Cookbook (2009).  They aren't the most beautiful things I've ever made, but they cure a chocolate craving in a pinch.


Makes 24 cookies (>>I find it only makes about 18.  Maybe I just make giant cookies...)


1 1/2 cups blanched almond flour (>>I use Bob's)
1/2 teaspoon sea salt
2 cups unsweetened, shredded coconut
1/4 cup unsweetened cocoa powder
3 egg whites
1 cup agave nectar (>>I recently made a batch with honey when I had run out of agave, and they totally turned out fine.)


Preheat the even to 350 degrees.  Line two large baking sheets with parchment paper. (>>This recipe assumes you have two sheets at your disposal; I only have one.  Just store the dough in the fridge when it isn't in use.)


In a large bowl, combine the almond flour, salt, coconut, and cocoa powder.  In a medium bowl, whisk the egg whites to stiff peaks with a handheld mixer.  Blend in the agave nectar.  Fold the wet ingredients into the almond flour mixture.  Spoon the dough 1 tablespoon at a time onto the prepared baking sheets, leaving two inches between each macaroon.


Bake for 15 to 20 minutes, until golden around the edges.  (>>Having made these a few times, I find I prefer them cooked a little bit longer.  They're delicious either way, but a longer cooking time leaves them a bit chewier, and they don't fall apart as easily.)  Let the cookies cool on the baking sheet for 30 minutes (>>not imperitive), then serve.


(>>I find that these store best in the fridge.  I think they taste better chilled anyway.)

16 February 2012

Praline Shortbread Squares

FULL DISCLOSURE - These are pricey to make. Almond flour is $10 a bag (for approximately four cups) and, then there's the pecans and agave. BUT, I dare say that I really love them. So yeah, there's always that. There's no gluten, refined sugar, and I'm pretty sure the butter could be substituted for vegan margarine. Otherwise, they're very easy to make and are a good source of protein.

Taken from Elana Amsterdam's The Gluten Free Almond Flour Cookbook (2009).

Shortbread
2 cups blanched almond flour (**I tried just blitzing 2 cups of almonds in a coffee grinder and the blanched almond flour is much better. The cookies stay together more and the shortbread turns out lighter without the almond skins.)
1/2 teaspoon sea salt
1/4 cup grape seed oil (**I used canola oil and it worked just fine.)
1 tablespoon agave nectar (**we usually buy the light stuff over the dark. I don't know what the difference is in flavour, though.)

Pralines
1/2 cup salted butter (**we only ever have unsalted and it seemed to work.)
1/4 cup agave nectar
1 tablespoon vanilla extract (**generous, obvsly.)
2 1/4 cups pecans, toasted and coarsely chopped

  1. Preheat the oven to 350 degrees. Grease an 8-inch square baking dish with oil and dust with almond flour.
  2. To make the shortbread, blend the almond flour, salt, oil, and agave nectar in a food processor until smooth. Press the dough into the prepared baking dish.
  3. Bake for 15 to 20 minutes, until golden brown. (**Watch them closely. I find they start browning rather early, so pull them out as soon as they start to look gold-ish on top. They don't taste undercooked and will hold together much better.) Remove from the oven and let cool.
  4. While the shortbread bakes, prepare the pralines. In a small saucepan over medium-low heat, melt the butter, then add the agave nectar and vanilla extract. Simmer for 5 minutes, then add the pecans. Remove the praline mixture from the heat, cool to room temperature, and spread over the shortbread.
  5. Place in the refrigerator for 3 hours to set. Cut into squares and serve.

The first batch of these I ever made didn't turn out too well. Probably a combination of homemade almond flour, adding the pecan mixture to the shortbread while it was still hot, and starting to cut them up before they were fully chilled. When I followed the directions more closely, they turned out fine, but I think they'll always be slightly crumbly.

07 January 2012

Cream Cheese Icing

Adapted from a recipe I saw on the Canadian Living website.

1/4 cup + 2 tbs cream cheese (**I've used light cream cheese and it was fine)
1/4 cup softened butter
1 tbs vanilla
1 1/2 cups icing sugar


Soften the cream cheese and butter on the stove. Add the vanilla. Whip in the icing sugar in 2 or 3 instalments.

I found that this was enough to do a crumb coat on the quinoa cake (aka you can barely do one coat and it was full of crumbs from the cake). If I were going to do this for a party or something, I would do a double batch and chill the cake between applications.


09 November 2011

Favourite Weeknight Salad 2

Dressing:

Just the juice of half a lime and lots of pepper

Salad:

Baby spinach
1 Yves Spicy Italian Veggie Sausage>> slice it diagonally (10-ish pieces) and sautee it in olive oil, letting it brown on one side before flipping it to brown on the other.

Optional: Toss in some warm quinoa

Dinner in a pinch.

Favourite Weeknight Salad 1

Dressing:

knob of blue cheese (less than a tablespoon) >> this makes enough salad dressing for more than one salad
olive oil
white wine vinegar
a tiny bit of salt
lots of pepper

Put the blue cheese in the bottom of the bowl, crush it with a fork a bit, and then whisk in the rest. This stores well in a jam jar in the fridge. A little cheese goes a long way.

Salad:

romaine
crushed toasted almonds
tart apple slices
cucumber

23 October 2011

Herbed Dinner Rolls

I'm slowly trying to branch out with the whole 'homemade bread' thing. Next after pizza dough was dinner rolls, which I think turned out quite well. The recipe for these came from a video that I stumbled upon online (linked at the bottom), and seeing them made via video really helped ease my concerns that I was doing it wrong.
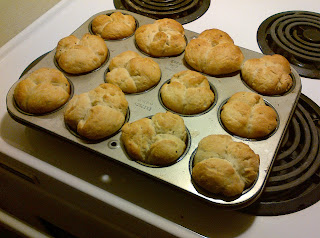

In a large bowl put together the following items:
  • 1 pouch of active yeast >> or 2 1/4 tsp, as per the jar. This is the regular, non-quick rise yeast
  • 1 cup of very warm (not hot) water
  • A pinch of sugar
Let the yeast sit for 6 to 9 minutes. It should bubble a bit and get kind of foamy.

Add:
  • 1/4 cup of melted butter
  • 2 cups of flour >> I used white All Purpose flour, though next time I'm going to try mixing in some whole wheat
  • 2 tbs sugar >> Next time I'm going to try honey
  • 1 1/2 tsp salt >> We only have sea salt, which is saltier than table salt. I only used about a 1/2 tsp of the sea salt because I prefer stuff less salted
  • 1/4 tsp thyme
  • 1/4 tsp oregano
  • 1/4 tsp dill
>> Note: I skipped the thyme because we didn't have it and skipped the dill because I don't care for it. Instead, I just added the oregano and a full teaspoon of chopped fresh rosemary. It seems like you could take a few liberties with the herbs if you wanted to.

Mix the ingredients above with a spoon until they have just started to come together.

Add another 1 1/2 cups of flour in 1/2 cup increments. I had to start using my hands to get it to come together. Knead it for 2 minutes - it should end up pretty sticky.

Place a tea towel (I used a dampened one) over the top of the bowl and put it in a warm place. Leave it for an hour. It should double in size.

Punch the dough down (one big one right into the centre). Take it out of the bowl, put it on a lightly floured cutting board, and flatten it into a disc (you could use a rolling pin, but hands work too). Using a big, sharp knife, cut it into six pieces, pizza style. Each of the six 'slices' are then ripped in half, and each half pulled into three rolled balls (so, each of the six slices becomes six small balls - you'll have thirty-six in the end).

Take a lightly greased muffin tin and in each pocket place three of the small balls. Recover with the tea towel and allow to rise in a warm place for approximately 45 minutes. They should double in size. >>I was concerned that mine weren't rising enough, so for the last twenty minutes I turned the oven on to 200 and let them rise on top. This seemed to work out alright.

Preheat the oven to 400 degrees. Melt a bit more butter (maybe 1/4 cup?) and brush on top of the buns (>>I will try omitting this step next time just to avoid so much butter. If it's really that integral to them browning on top, maybe I could try using olive oil instead?). Bake for 16 - 20 minutes, and cool on a wire rack.

We had a couple of these last night, and then I froze the rest. I will update when I know how they are from the freezer.

Original recipe/video here.

07 October 2011

Quick whole wheat pizza dough

Culled together from a few different websites. It's enough for one large pizza.

1 package quick rise yeast
3/4 cup warm water >>not too warm, just 'a bit warmer than lukewarm', according to Sarah
1 1/2 cups whole wheat flour
1/2 cup all purpose flour >>you have to add a bit of regular flour, otherwise it will come out too tough.
1 tsp salt
1 tsp honey >>use honey instead of sugar for a crispier crust

  1. Dissolve the package of yeast in the water and leave for 5ish minutes. It should get a little foamy/frothy on the top.
  2. Add all remaining ingredients and mix together with a spoon.
  3. Knead for 2 - 3 minutes.
  4. Leave in a warm place for an hour or hour and a half. Ideally on top of a stove with a bit of heat in it, but on top of the fridge is also okay. >>true story: I made a dough at 12:30 and didn't come home to make pizza until 5:30 and it turned out okay because my roommate punched it down a few times. Hells yes.
  5. Preheat oven to 350 degrees.
  6. Clean off some counter space and drizzle it with a bit of olive oil. Don't form the pizza in flour, otherwise it'll end up too dry.
  7. Use "Domino's Method" for spreading out pizza dough (>>ask me sometime and I'll show ya).
  8. Cook for 10ish minutes, add your toppings, and then cook for another 5 to 10 minutes
Enjoy! I liked this one because it didn't get too doughy in the middle.

29 September 2011

Pistachio-Crusted Cod Fillets

I picked some cod up from the grocery store on a whim tonight and this recipe was great. It's taken from Fine Cooking 49, p 82 (1 March, 2002). Kind of similar to the mayo/potato chip combo, but I actually prefer this a lot more (not as rich). I must say, the photo doesn't really do this justice.

1/2 cup unsalted shelled pistachios
1/3 cup fresh breadcrumbs >>we had seasoned breadcrumbs on hand (so no need to add parmesan), but I can't wait to try this with panko (Japanese breadcrumbs)
2 Tbs. grated Parmesan
1/2 tsp. coarse salt; more to taste >>I recommend cutting this way down since the Dijon mustard (below) is plenty salty, and you're also already adding a salted cheese
1/8 tsp. finely ground black pepper; more to taste
2 Tbs. olive oil
4 cod fillets, preferably loin pieces (4 to 6 oz. each)
2 Tbs. Dijon mustard


Heat the oven to 425°F. Line a small baking sheet with foil and lightly grease the foil (spray is fine).

Chop the pistachios into medium-fine pieces. Combine the nuts, breadcrumbs, Parmesan, salt, and pepper in a shallow bowl. Drizzle with the olive oil and toss with a fork until the crumbs are evenly moistened.

If using fillets with tapered ends, loosely fold the ends under to create a fillet of even thickness. Spread the top of each fillet evenly with the mustard. Press the mustard-coated side of each fillet into the crumb mixture to generously coat the fish. Set the fillets, coating side up, on the prepared pan. Sprinkle the remaining crumb mixture over the fillets to form a thick coating.

Bake the fillets until the topping is crisp and browned and the fish is cooked through, 10 to 12 min., depending on thickness (see below for doneness test). Serve immediately.

nutrition information (per serving):
Calories (kcal): 280; Fat (g): 16; Fat Calories (kcal): 140; Saturated Fat (g): 3; Protein (g): 26; LinkMonounsaturated Fat (g): 9; Carbohydrates (g): 9; Polyunsaturated Fat (g): 3; Sodium (mg): 580; Cholesterol (mg): 50; Fiber (g): 2;


Original recipe/photo

29 August 2011

Gluten-Free Quinoa Chocolate Cake

My friend Koleta brought this to a potluck I had recently and it was awesome. I made it with a cream cheese icing (which I will post soon) and it was super moist.

2/3 cup white or golden quinoa
1 1/3 cup water
1/2 cup goat milk >> I didn't have any of this on hand. My mother suggested I use Half and Half cream, which I kind of regret doing (for caloric reasons). Next time I'll do skim milk for sure.
1 tsp vanilla extract >> I always use more vanilla. I easily used 1 tbs.
3/4 cup melted and cooled butter >> what I usually do is cut the butter into cubes (maybe 2cm x 2 cm), lay them out untouching on a plate, and microwave for two short 10 second blitzes. I find this helps you get evenly softened butter, as opposed to a huge brick that is liquefied on the outside yet still cold and hard in the middle.
1 1/2 cups white or cane sugar
1 cup unsweetened cocoa powder
1 1/2 tsp baking powder
1/2 tsp baking soda
1/2 tsp salt
4 large eggs

  1. Bring the quinoa and water to a boil in a medium sauce pan. Cover and reduce to a simmer and cook for 10 minutes. Turn off heat and leave the covered saucepan on the burner for another 10 minutes. Fluff with a fork and allow to cool. >>I was in a crunch for time so I spread the quinoa out over a large dinner plate and put it in the fridge for a bit. It would have taken forever to cool down in a hot saucepan.
  2. Preheat oven to 350. Lightly grease two 8 inch cake pans.
  3. Combine milk, eggs, and vanilla in a food processor or blender. Add 2 cups cooked quinoa (>> I found that using 2/3 cup dry quinoa and 1 1/3 cups water produced exactly 2 cups cooked quinoa. How perfect.) and butter and continue to blend until smooth. >> It will still have a few chunks, obviously.
  4. Whisk together the sugar, cocoa, baking powder, baking soda, and salt in a medium/large bowl. Add the contents of the food processor and fold until blended.
  5. Divide the batter evently between the pans and bake on centre rack for 40 - 45 minutes (>> I was fine after 40. The toothpick came out clean-ish and the edges had pulled back from the side of the pan). Cool before icing.

Burrito Stacks

Courtesy of Crazy Plates, by Janet and Greta Podleski (1999). I made this as a vegetarian entree for a potluck I was hosting and it went over really well. These can be done in the oven as the original recipe suggests, but we've also done them on the barbecue on top of tin foil (curled up at the sides) and they were also great.

1 1/2 cups seeded, diced tomatoes >> I did this once with regular tomatoes and once with roma tomatoes (the oblong ones) and preferred the regular ones. The regular tomatoes gave off a lot more fluid in the cooking process, which I think helped soften the tortillas when they were stacked.
1/2 cup of the following:
  • whole-kernel corn>> fresh off the cob is ideal
  • diced onions
  • diced red bell pepper
  • unpeeled, diced zucchini>> any type works. We used the weird yellow flying saucer variety and they were perfect
1/2 cup grated carrots
1 jalapeno pepper, seeded and minced
1 clove garlic, minced
1 1/2 tsp ground cumin
2/4 tsp chili powder

1 cup canned black beans, drained and rinsed >> You can add a bit more if you like, since black beans don't last that long in the fridge.
1/2 cup chopped, fresh cilantro >> I've forgotten this before and it wasn't the end of the world
1 tbsp lime juice
4 7-inch flour tortillas >> I recently tried using more traditional corn tortillas (the small ones) and this didn't work nearly as well. Stick to the flour grocery store brand (Old El Paso?), as inauthentic as they are.
1 cup shredded, reduced-fat Monterey Jack cheese (4 0z) >> I've started eating the PC Blue Menu reduced fat marble cheese and it's awesome. (This is coming from someone who previously had gagged eating No Name low fat cheddar and vowed to never touch it again.)
1/4 cup chopped green onions
1/3 low fat sour cream
1/2 cup copped lettuce >> I rarely actually use this because I find that the rest of this is usually enough. Also, I'd rather just do a side salad anyway instead.

  1. Preheat the oven to 400 degrees. Spray a medium, non-stick saucepan with non-stick spray (>> very important, because these stick like fiends.). 1 cup tomatoes (>> I usually just add them all), plus next 9 ingredients (>> everything up to the beans). Cook and stir for 5 minutes, until vegetables are softened. Add beans and cook for 2 more minutes. Remove from heat and stir in cilantro and lime juice.
  2. Spray a baking sheet with non-stick spray. Place one tortilla in middle of tray. Spoon 1/3 bean mixture over tortilla, followed by 1/4 cheese. Repeat layering 2 more times. Place final tortilla on top, and sprinkle with last bit of cheese and green onions.
  3. Bake for 15 to 20 minutes, or until cheese is melted and tortiallas turn golden brown around edges. Remove from oven and slice into 4 wedges. Top with sour cream, remaining tomatoes, and lettuce. >> As mentioned, I usually skip this last step and just serve with sour cream and homemade salsa on the side.

08 July 2011

Kale Chips

Nothing revolutionary here. Just putting this up so I remember the oven temp/time.
NOTE- These are best if eaten the day you make them. I just found out the hard way that storing them for the next day results in soggy chips. I'm probably going to put them all on a pan and give them a blitz in the oven before I serve them today.

Ingredients:
Kale, washed and de-spined
olive oil (enough to lightly coat)
salt (minimal)
fresh cracked pepper (lots)
nutritional yeast (a few heaping teaspoons, however yeasty you like your kale chips)

Toss all ingredients in a bowl. Spread out over Silpat and bake at 300 degrees for 15 minutes. I found the crisped up better when they were pressed flat and weren't touching one another, which meant that one full bunch of kale had to be stretched over four batches in the oven. Lots of work but very worth it.

21 June 2011

To Try: Gluten-Free Brownies

No time to post full recipe. Here is the link. Try soon
http://www.sophisticatedgourmet.com/2011/06/amazing-brownies-gluten-free/

10 June 2011

To try: Greek Yogurt Popsicles

This was on 'Cup of Jo' this morning and I must try it soon. I think I'll buy some agave to substitute for the refined sugar. 1/2 a cup is a lot for only 1 and 1/2 cups yogurt! The accompanying recipe was for avocado popsicles, which I was slightly less excited to try...

Greek Yogurt Pops with Berries (Adapted from Paletas, by Fany Gerson)

Ingredients:
1 lemon (you just need the peel)
1/2 cup water
1/2 cup sugar
1 1/2 cups plain unsweetened Greek-style yogurt
2 tablespoons honey
2 cups fresh blackberries, or the berry of your choice

Rinse the lemon, then peel it. Combine the water and sugar in a small saucepan and cook over medium-high heat, stirring until the mixture comes to a boil and the sugar has dissolved. Add the lemon peel, lower the heat, and simmer for 5 minutes. Let cool to room temperature. Strain the syrup through a fine-mesh sieve, then refrigerate until chilled.

Put the yogurt and honey in a bowl, add the chilled syrup and stir well. (You can also do this in a blender, but we just stirred by hand.) Pour a bit of the yogurt into each of the popsicle molds, to a height of about 3/4 inch. Freeze until the mixture begins to set, about 40 minutes.

Next divide the blackberries among the popsicle molds, thn pour the remaining yogurt mixture, dividing it evenly among the molds. Snap on the lid of the molds and freeze until solid, 3 to 4 hours.


Original recipe/photo

08 June 2011

Chickpea Tacos

I started looking for a chickpea taco recipe when I realized that soy wasn't agreeing with my stomach very well. These are great in tortillas (hard tacos get pretty messy), but also good in salad and just for snacking. I usually just use $2 store-bought taco seasoning and it works just fine. See the original post (linked below) for a recipe for homemade taco seasoning (which I plan to do at some point to better control the salt).

1 can chickpeas, rinsed & drained >> I've used 2 cups of dehydrated chickpeas (that have been soaked overnight and boiled for 90 mins) and it worked just fine.
1 Tbsp. tamari >> soy sauce works as a substitute
2 tsp. lime juice >> half a lime
2 Tbsp. taco seasoning
whole wheat tortillas
lettuce >> we did arugula and it was lovely
tomato, diced
2-step guacamole* (mashed avocado + minced garlic & Kosher salt)
(optional) fresh cilantro, roughly chopped

1.) Pre-heat oven to 400 degrees F.
2.) Spray a cooking pan with olive oil & set aside>> lining the pan with tin foil or a Silpat is helpful.
3.) In a large bowl, whisk tamari, lime juice, and taco seasoning together.
4.) Add chickpeas to bowl, tossing until well-coated.
5.) Place chickpeas on pan in an even layer, spray lightly with oil, & bake for 20-25mins. >> I find I take them out halfway through and mix them around a bit. Take them out after less time if you want them to be a little softer on the outside.
6.) Remove from oven, assemble tacos (lettuce first!), & serve.

Original recipe/photo

To Try: Creamy Lemon Pasta

It's hummus on pasta. I would have never thought of it, but now that I've heard of someone doing it I CAN'T GET THE IDEA OUT OF MY HEAD. Update when I get around to making this.

Ingredients
8 oz. whole wheat spaghetti (or other noodles of your choice, i.e. zucchini pasta, kelp noodles, etc.)
1/2 c. hummus, prepared or homemade
1 lemon, juiced + 1 T. lemon zest
2 t. reduced sodium soy sauce
1 T. nutritional yeast
1/2 c. chopped basil


Instructions
  • Prepare noodles and set aside.
  • In a large bowl, combine hummus, lemon juice, soy sauce and nutritional yeast.
  • Add pasta, lemon zest and basil and toss to coat.
  • Season with salt and pepper, if desired.
Original recipe/photo

To try: Roasted Potatoes with Sea Salt and Thyme

I think about roasting baby potatoes all the time, and it's really not hard to just toss potatoes in a 350-degree oven, but sometimes it's nice to have a recipe with the specifics so they come out perfect (and not undercooked) every time. Will try this soon.

Serves 4 as a side dish

1 1/2 pounds small or new potatoes, with skin
1 garlic clove, minced
2 tablespoons extra-virgin olive oil
Sea salt
Freshly ground black pepper
3-4 thyme sprigs, plus extra for garnish


Preheat oven to 425 F. Quarter potatoes and place in a large bowl with the garlic. Drizzle with olive oil. Toss to coat potatoes. Sprinkle with salt and pepper. Toss again. Dump the potatoes on a rimmed baking sheet. Scatter the thyme sprigs around the potatoes. Place baking tray on lowest rack in the oven. Bake 30 minutes without disturbing. Move baking tray to top half of the oven and continue to bake another 30 minutes. Remove and transfer potatoes to a bowl. Garnish with additional sea salt and thyme sprigs.

Original recipe/photo

31 May 2011

Ginger-Mushroom Marinade

Just had this on some halibut that Dad made and he said he winged it. Would try on halibut again, or perhaps even tofu. Good for anything mildly flavoured. Maybe it would work in a stir-fry?

Basics (no real measurements, just eyeball it):
- olive oil
- balsamic vinegar
- 2 cloves of garlic, minced
- a couple inches of ginger, minced
- healthy dose of mushroom sauce*

*The mushroom sauce was in the cupboard from when I was looking for vegan alternatives to fish sauce. I think this was the main flavour that caught my attention and that I couldn't place (thus prompting me to ask what was in the marinade). I'm glad to have found another way to use the mushroom sauce!

Very good, but don't skip the mushroom sauce.